


Location
Hassocks, West Sussex
Room Type
Long living room
Fire
AmberGlo 60 electric media wall fire
Key Features
4m media wall with stepped-out chimney breast housing a 3-sided electric fire, six illuminated display shelves with slat panelling, and Shaker-style storage cupboards
What our client wanted
Our client contacted us while preparing for her move to a new home in Hassocks. Interestingly, she hadn't actually moved into the property yet when we first quoted for the media wall.
Rather than waiting until she had the keys, she sent us the floor plans from the Rightmove listing so that we could start understanding the room and work out how a large bespoke media wall could fit into the space.
The brief was to create a substantial feature wall across approximately 4–4.5 metres, centred around the television and an electric fire.
The design also needed to provide plenty of useful storage without making the wall feel too heavy. Three open shelves were planned on each side of the central section, with bespoke cupboards underneath.
Our client also wanted the shelving to have its own lighting, with slat panelling fitted to the backs of all six shelves to add texture and interest.


The design process
The size of the wall gave us an opportunity to create a properly balanced composition, rather than simply building around the television.
The central section was designed to accommodate the customer's TV, with the electric fire positioned beneath it. Either side, three open shelves were stacked vertically to create symmetry, with storage cupboards beneath.
We also needed to think about all of the less visible details that make a media wall work properly in everyday life.
The design included:
Six open display shelves positioned symmetrically around the TV
LED downlights within each shelf
Dimmable lighting, allowing the atmosphere to be changed depending on how the room was being used
Slat panelling to the backs of all six shelves
Bespoke Shaker/slab-style cupboards beneath the shelving
Push-to-open mechanisms to keep the cupboard fronts clean and handle-free
An internal shelf within each cupboard for practical storage
A planned location for the Sky/Wi-Fi box, either behind the TV or inside a cupboard
Additional electrical sockets where required for the TV, fire and other media equipment
Planning these details before construction meant that the finished wall could hide the practical elements while keeping the visible design clean.
Building the media wall
Once the design was agreed, we built the media wall using a timber frame, creating the structure needed to support the television, electric fire, shelving and cabinetry.
The central opening was designed around the customer's television, with the fire positioned beneath it. The surrounding shelving and cupboards were then built to create the symmetrical arrangement established during the design stage.
The six shelves were prepared for integrated LED downlights, with the wiring concealed within the structure of the media wall.
Slat panelling was also fitted to the backs of the shelves. This creates a change in texture between the main wall and the individual display areas, giving the shelving more depth once the lighting is switched on.
The bespoke cupboards were fitted below the shelving with push-to-open mechanisms. Keeping the doors handle-free helps maintain the clean lines of the overall design while still providing generous concealed storage.
Electrical work was incorporated during the build, including provision for additional sockets where required.
Choosing the electric fire
For this project, the client selected the AmberGlo 60 Black Inset Media Wall Fire from Furniture123, with its configurated tempered glass front and sides.
The fire was designed to sit beneath the TV as part of the central feature, giving the media wall a second focal point and bringing warmth and movement to what would otherwise be a static TV wall.
The option of a three-sided installation also works particularly well within a wider media wall design, as it can give the fire greater visual prominence from different positions within the room.
Plastering and finishing
With the carpentry and electrical work complete, the media wall was professionally plastered to create a smooth, seamless finish.
The wall was then prepared for decoration with:
Light sanding
One coat of watered-down white emulsion
Two coats of the client's chosen primary colour
A new skirting board was also supplied and fitted across the base of the media wall, helping it feel properly integrated into the room.
These finishing details are important on a bespoke media wall. Rather than looking like a separate piece of furniture positioned against the wall, the finished installation is designed to look as though it belongs there.

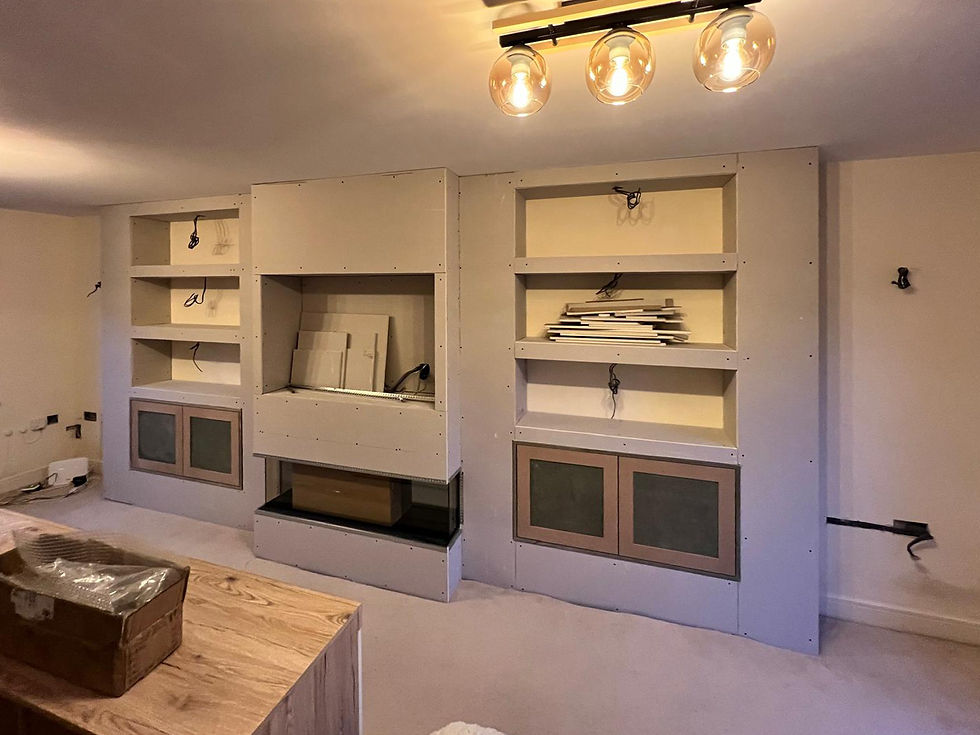

The Finished Media Wall
The finished Hassocks media wall brings together a number of different elements without allowing any one feature to dominate.
The central television and electric fire create the main focal point, while the six illuminated shelves add space for photographs, artwork and decorative pieces.
Below them, the Shaker-style cupboards provide concealed storage for the things that don't need to be on display.
The slatted shelf backs introduce texture, while the dimmable LED lighting allows the appearance of the wall to change with the room, from brighter display lighting during the day to a softer atmosphere in the evening.
Perhaps the most unusual part of this project was that the design began before our client had even moved into the house. Starting with nothing more than the property's Rightmove floor plans, we were able to develop the concept around the room and then turn that plan into a fully fitted feature once the project began.
The result is a media wall designed not just around a television, but around how the room will actually be used, combining entertainment, storage, display and lighting into one bespoke installation.


